

If you’re looking for a convenient way to take advantage of the growing ecommerce landscape, moving your retail store to Shopify could be an excellent first step.
Shopify is one of my top ecommerce platform options for businesses of all sizes, offering exceptional scalability, ease of use, and flexibility.
But for beginners, getting started can be a little challenging. That’s why I’ve created this simple Shopify migration guide, to get you started on the right foot in 2024 if you want to get started with moving your retail business to Shopify.
Let’s dive straight in.
Key Takeaways
- Moving your retail business to Shopify starts with choosing the right plan. The Basic plan is ideal for beginners and solo entrepreneurs, the Shopify plan is great for Teams, and the Advanced plan is fantastic for scaling companies.
- Choosing the right theme and editing your Shopify store’s appearance to match your brand is crucial to standing out in the competitive ecommerce space. Make sure you choose a theme that looks professional, and makes navigating your store simple.
- Remember to carefully configure your shipping, taxes, and domain settings before you launch your store, and pay close attention to setting up pricing, inventory management settings, and any other details relevant to your store.
- Consider adding apps to your store to help you offer a more advanced user experience. Experiment with apps for marketing, page design, accounting, loyalty programs, and even store analytics.
- Invest in a range of strategies to promote your online store, from social media marketing, to SEO, content marketing, and email campaigns.
Selecting the Right Shopify Plan and Setting up your Store
The first step is choosing the right pricing plan for Shopify. While you can create an account for free for 3 days, you will then need to move onto a paid plan, so you can continue running your store.
Unless you’re simply looking for a way to sell through social media and messaging platforms, I’d recommend skipping the Starter plan.
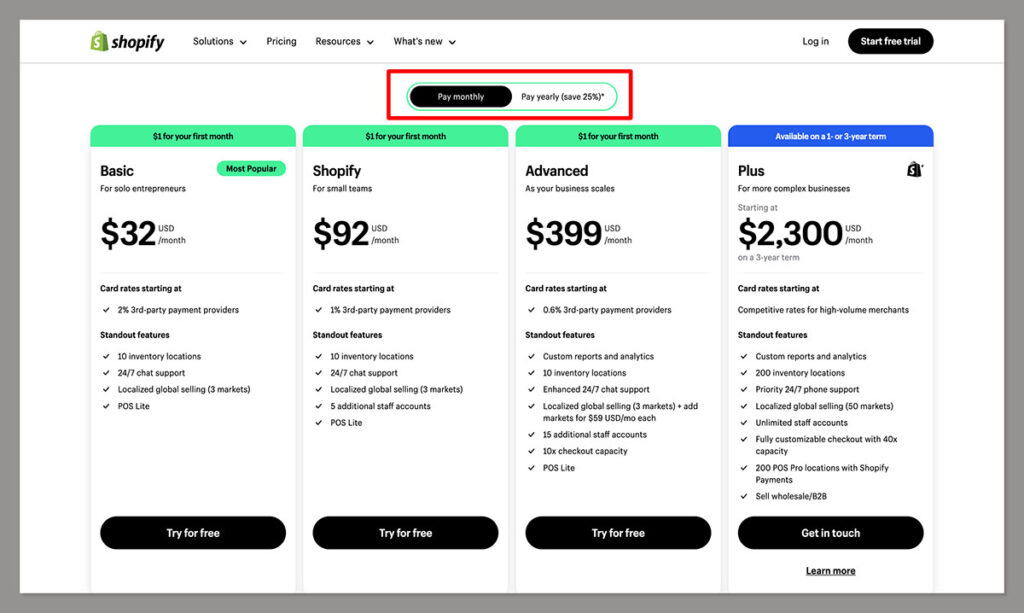
Instead, focus on the 3 core plans:
- Basic Shopify (starting at $29/month) is ideal for solo entrepreneurs who are just getting started. Although it only gives you one account, you will have 10 inventory locations, 24/7 chat support, and even access to Shopify’s POS Lite solution.
- Shopify (starting at is great if you’re running a small business and need more accounts for your staff members. It also comes with slightly cheaper credit card processing rates.
- Shopify Advanced is fantastic if you need access to more comprehensive reports, enhanced customer service, and up to 15 staff accounts.
If you’re looking for absolute flexibility, and the most advanced Shopify customization options, you can also consider a Shopify Plus account.
However, with a price starting at around $2,300 per month, I’d really only recommend this plan for the biggest companies.
Creating your account should be relatively straightforward. All you need to do is enter a few details, like an email address and password, and your store’s address.
Once your account is set up, you’ll be redirected to the Shopify admin page, where you can start configuring your store.
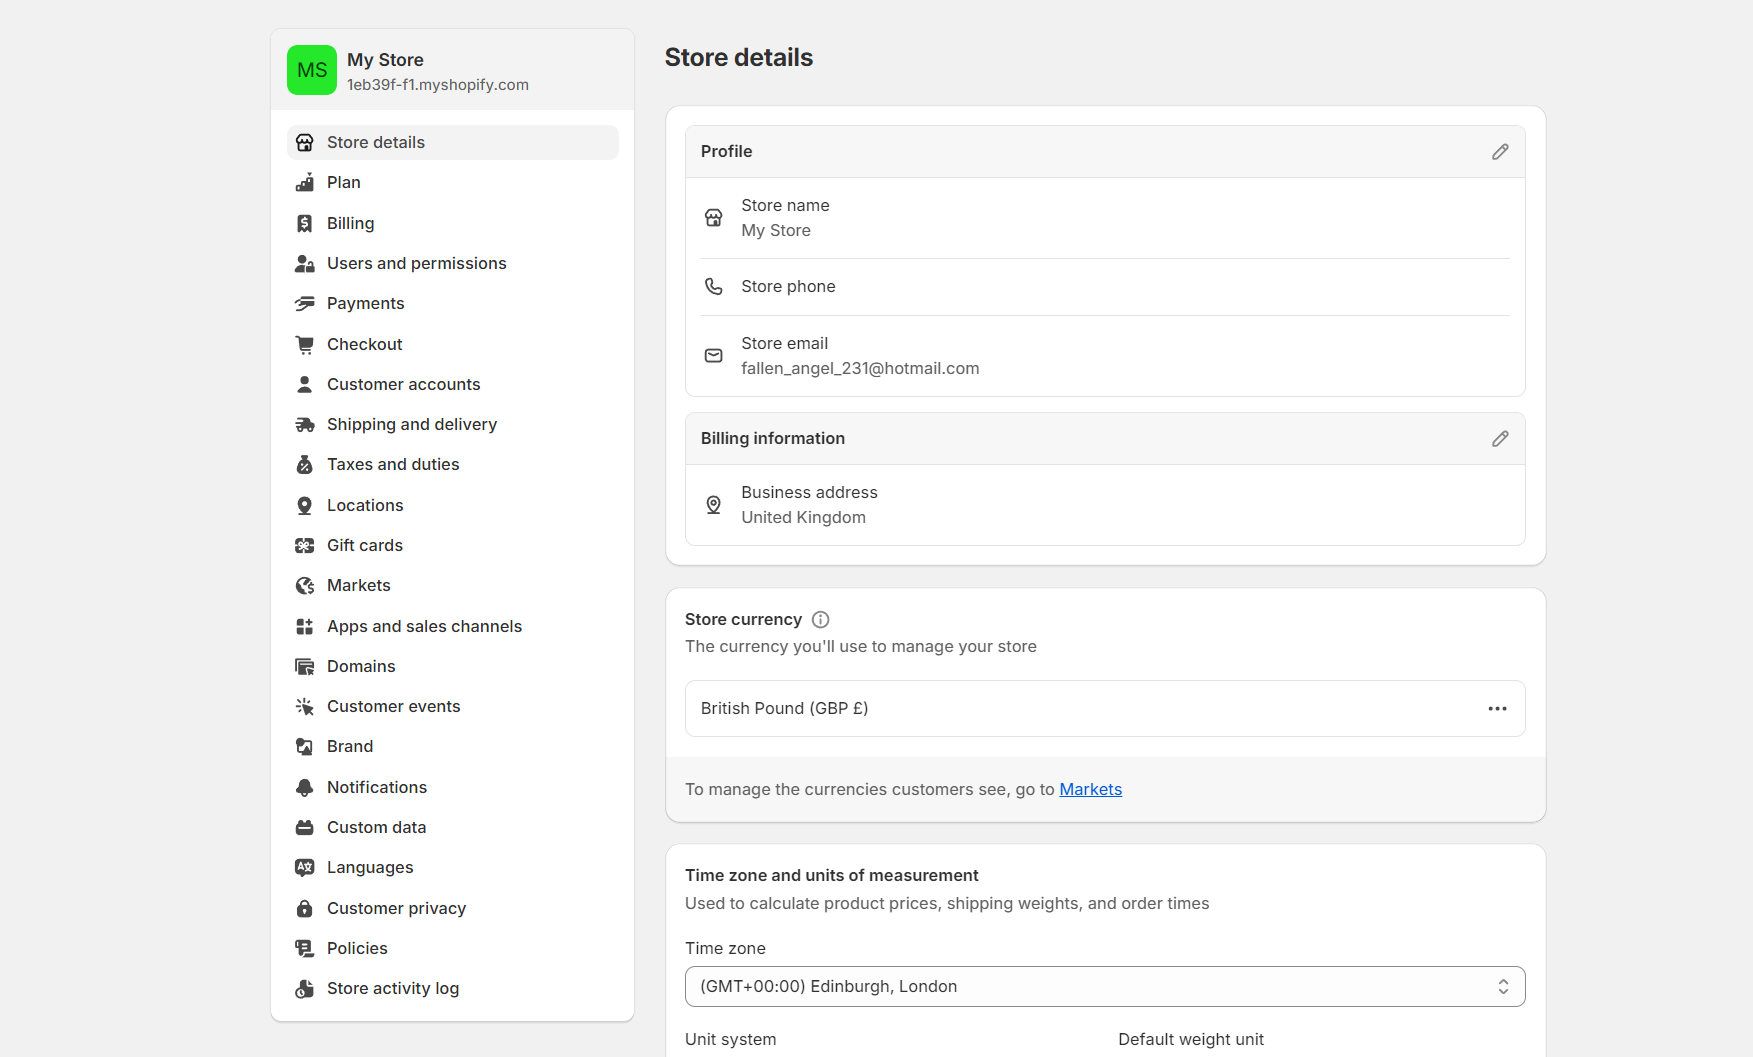
On the bottom left-hand corner of the screen, you’ll see the “Settings” button. Click this and you’ll be taken to a page where you can edit all of your store’s details. Here you can:
- Enter all of your store’s details, including the currency you’re going to be accepting payments in, and your required time zones and units of measurement.
- Choose your payment processing option. I recommend selecting Shopify Payments, as this will save you from having to pay any additional transaction fees.
- Configure your shipping and delivery settings, including options for local delivery, local pickup, and delivery customizations.
Designing Your Shopify Store
After you’ve configured your basic settings, you can start to have some fun with the appearance of your Shopify website. From your dashboard, click on “Online store”.
This will take you to a dashboard where you’ll see your current theme, as well as popular free and premium themes.
You can either stick with the default free theme offered by Shopify (Dawn), or click on the “Add Theme” button, followed by “Visit Theme Store”, to choose from a range of options.
One of the things I love about Shopify is that themes are organized into categories, and some are specifically optimized for certain industries, like retail businesses or restaurants.
You can filter through your options either by choosing an industry, specific features you need, or selecting the button for “free” or “paid” themes.
If you’re just getting started, a free theme is usually a good choice, but keep in mind the features you get will be limited.
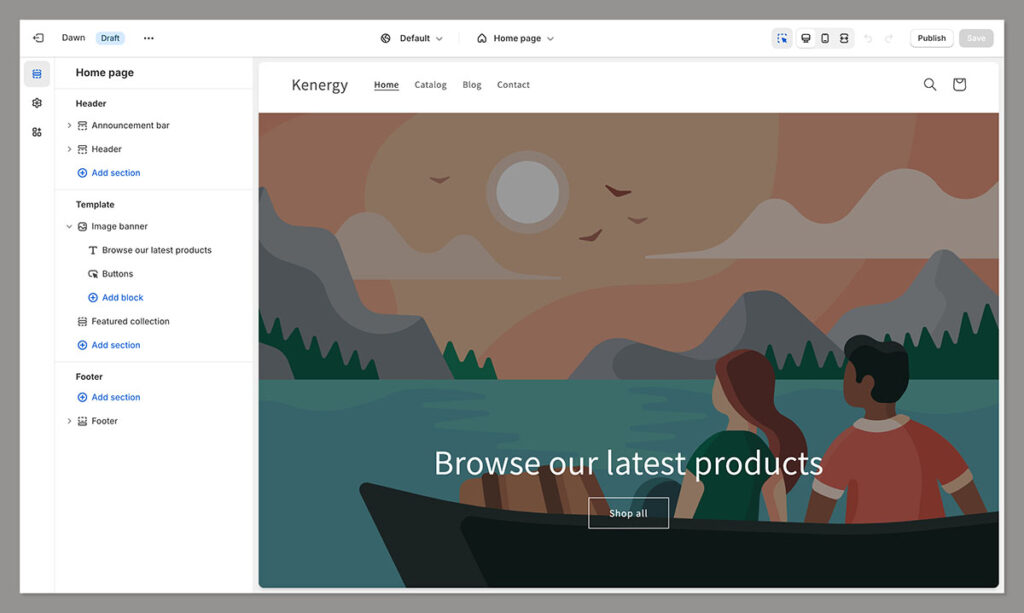
Once you select your theme, go back to your Shopify dashboard, and click on the “Customize” button next to your theme to start editing the appearance.
The level to which you can customize your store in Shopify’s theme editor will vary depending on the features of the theme and your coding skills. The good news is you can make simple changes very easily. I recommend:
- Uploading your own images and banners that are unique to your brand.
- Adjusting the font choices throughout your store pages, focusing on consistency.
- Adding your own custom brand colors within the “Settings” section
- Experimenting with your page layout using Shopify sections
It can take a little while to totally configure your store to a point where it looks and feels unique to your brand. Don’t be afraid to spend some time experimenting.
However, I do recommend saving your theme before you make any major changes just in case something does go wrong. You can also consider working with a specialist or designer on Shopify theme customization.
Product Management and Optimization
Now you have a great-looking theme, it’s time for one of the most important parts of the online store setup process: adding your products.
Back in your Shopify store’s dashboard, you should see the “Products” tab on the left-hand menu. Click this, and you’ll be directed to your store’s product page.
You can add products one-by-one, or import a list of products via a CSV file.
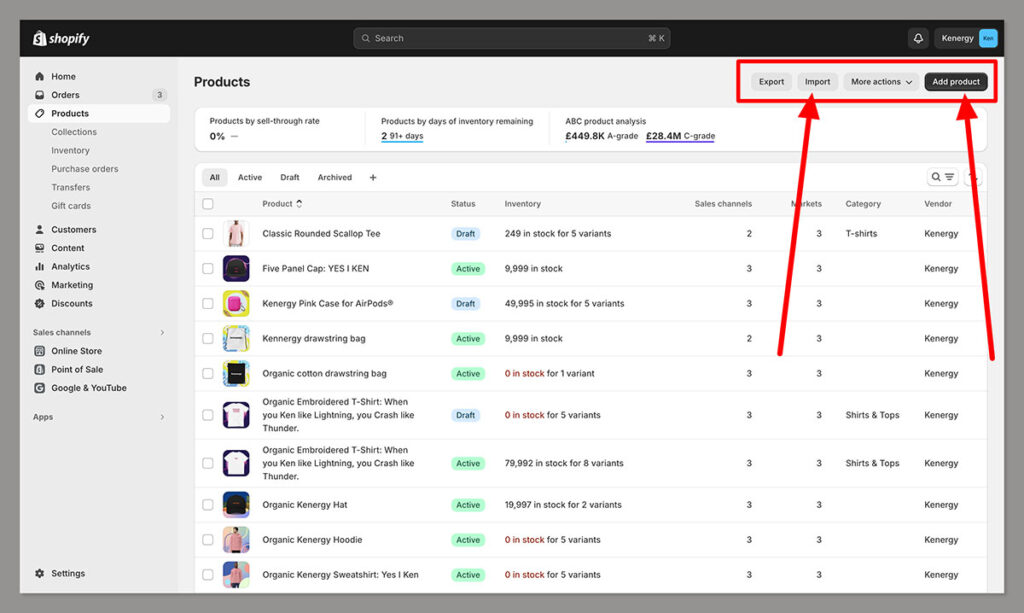
Another option is to use an app from the Shopify app store to migrate your products from one environment to another as quickly as possible. Alternatively, you can work with Shopify experts on the migration process, but this could incur an additional fee.
When you add a product to your store, you’ll need to enter data for each item, including a photo, video, or 3D model, a description, title, and pricing information.
The process is pretty straightforward, but it can take a little time if you have a lot of items to upload.
Fortunately, Shopify does walk you through the process, making it easy to implement shipping configurations, variants, search engine listings, and more.
You can also set your pricing here, so make sure you do your research to find a competitive price for each product.
Once you have all of your products uploaded, you can begin to organize them into collections.
Product Management on Shopify
Click on the “Collections page” within Shopify, and click on the “Create Collection” button. You’ll be taken to a page that asks you to enter a few details about your collection, such as a title and a description. You’ll also be able to choose between making the collection “manual” or “automated”.
Initially, I’d advise starting with a manual collection, so you can maintain complete control over the products in each collection. However, as your business grows, the “automated” option should help save you some time. It’ll automatically add products that meet specific conditions to each collection.
For instance, you might set conditions for all products that feature the word “t-shirt” in the title to be added to a “t-shirt” collection.
Just like with Shopify’s product pages, you’ll have access to some useful features on this page, including options for Shopify SEO.
For instance, you can add a title and description to see how your collection will appear on the search engine results pages.
I’d also advice adding a main image to each of your collections, to give your store a more professional touch.
An image should also help customers to navigate your store more effectively. Plus, ensure you visit the “Inventory” page to set up your inventory management settings.
Configuring the Crucial Details of your Shopify Store
Before you officially launch and promote your Shopify store, it’s important to ensure your online retail business is setup for success.
First, you’re going to need a unique domain name, to help customers find your store. Go back to the Settings page on your Shopify dashboard, and click on the “Domains” tab. You’ll notice you only have a random domain from Shopify to begin with.
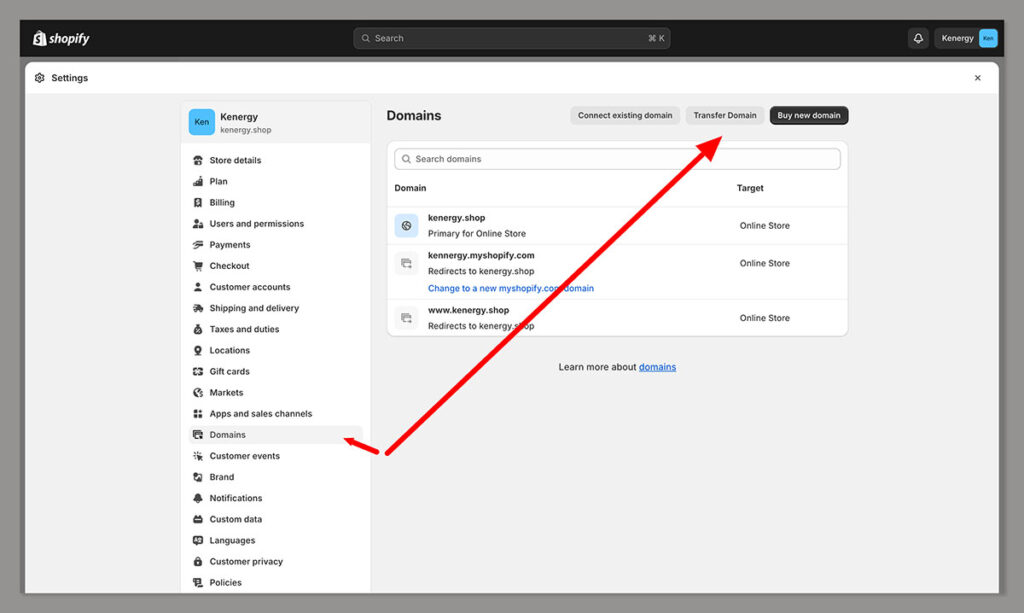
You can change to a new “myshopify” domain for free, but I’d recommend creating an entirely new, professional .com domain.
You can buy a new domain directly from Shopify, or you can connect a domain you’ve already purchased from a third-party company like GoDaddy.
Ensure the domain you choose is simple, relevant to your industry (use keywords if possible), and easy to remember and spell.
Next, head to the “Shipping” section of your Settings again. Here, you’ll be able to decide exactly how you’re going to fulfil orders placed by your customers.
You can edit packing slips, add custom order fulfillment services, or simply use Shopify shipping to calculate shipping rates, and print shipping labels. You can also create custom rates for specific groups of products.
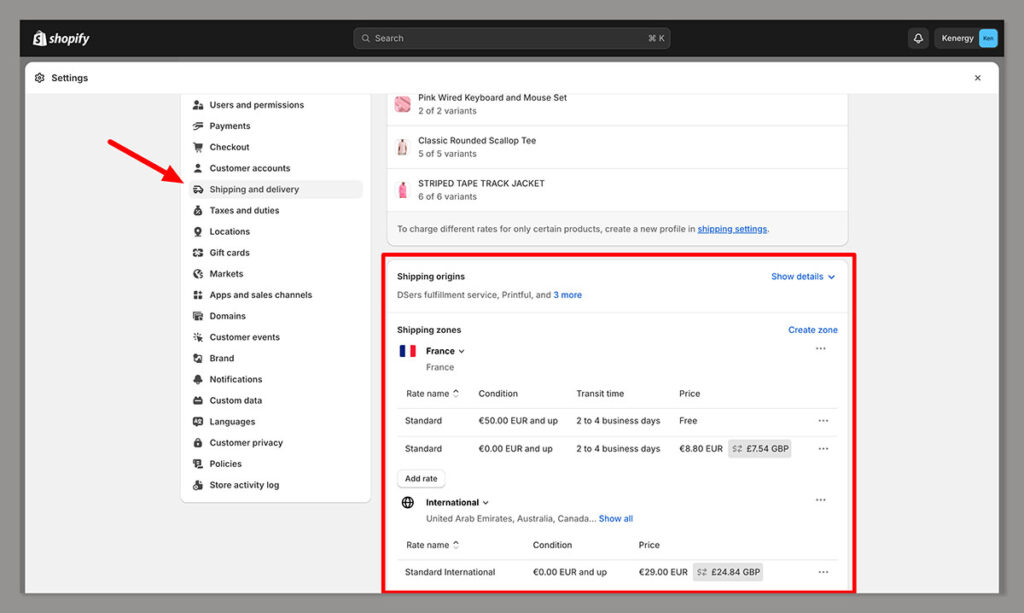
For the best customer experience, I’d recommend turning the option to “show automated delivery dates at checkout” to your customers.
This gives them an excellent insight into when to expect their packages. You might also consider offering local pickup if you have a physical store location.
Finally, make sure you’re prepared to handle the legal side of your business, by setting up your taxes and duties.
You’ll need to create shipping zones for each region you want to collect tax in, then select it in the “taxes and duties” page in your Shopify settings to manage the tax settings.
Shopify does give you the option to add a tax service to Shopify, that will help you keep on top of any legal tax requirements.
Plus, if you’re on Advanced Shopify, you can collect duties and taxes at the checkout automatically, which can save you some time and effort.
How to Add Shopify Apps to Your Store
One of the great things about Shopify, is how flexible it can be. Not only do you have the option to sell through various channels, from Amazon to social media, but you can connect your own payment processor (like PayPal or Stripe), and access a host of Shopify apps for different features.
Adding apps to your Shopify store can allow you to tap into new tools for social media marketing or Shopify SEO, access tools for creating loyalty programs, streamline tax management and more.
I’d recommend being cautious with how many apps you add to your store at first, however. Apps can incur additional fees, and too many could impact your store’s performance.
To start adding apps, simply click on the “Add Apps” button in your Shopify dashboard.
Next, click on the Shopify App Store link, and you’ll be directed to Shopify’s app marketplace, where you can browse through popular apps. You’ll be able to choose from a range of options, including:
- Dropshipping, POD, logistics, and fulfillment apps
- Product reviews apps and marketing apps (email, social media, SEO)
- Analytical apps for insights into your store
- Store design apps for image optimization and more
When you find an app you want to add to your store click on it, and choose the “Install” button to add it to your store. Pay close attention to the pricing for the app, however.

Some companies do offer an initial free plan or demo, but will charge a subscription fee after your demo runs out.
Once you add an app to your store, you’ll be able to find it within the “Apps” tab on your Shopify admin dashboard, and edit its settings.
Essential Pages for Your Shopify Store
Now it’s time to ensure you have all of the crucial pages you need on your Shopify store to inform, educate, and convert your customers.
To start creating pages, click on the “Online store” section of your dashboard, followed by “Pages”. As standard, Shopify already gives you a pre-configured “Contact” page to work with, which you can edit with all of your contact details.
To add a page, click on the “Add Page” button in the top right corner. Here are the main pages I recommend getting started with:
Your Home Page
Your home page is the “welcome page” for your online visitors. It should give your customers a direct insight into your brand, what kind of products you offer, and how to navigate your store.
Make sure your home page looks clean and professional. Avoid overwhelming your customers with too much information straight away, but ensure your brand’s personality and value shines through.
You can use images, videos, and even carousels to draw attention to your top-selling products, and add CTA buttons that inspire your customers to take action.
If possible, I recommend using unique photos on your home page, and avoiding any stock imagery. It’s also a good idea to optimize for search engines, with a meta description, relevant title, and URL.
Product pages
When shopping online, customers can’t actually interact with your products, which is why it’s so important to give them all of the information they need on your product pages. I recommend:
- Using incredible imagery: Use high-quality product photos showcasing your items from multiple angles, or consider using videos to help engage your audience.
- Writing powerful product descriptions: Craft product descriptions that demonstrate the benefits of your products for your target audience. Make sure your descriptions are SEO-friendly, featuring competitive keywords.
- Adding CTAs: Include a clear add-to-cart button, to ensure customers can quickly choose the items they want to purchase.
Shipping FAQ
One of the biggest issues customers have when shopping online, is limited insight into shipping costs and delivery times.
You can save yourself a lot of effort responding to questions, and boost your chances of conversions by creating an FAQ page where you answer all of the most common queries about shipping.
If you’re not sure which questions to answer on your FAQ page, consider checking out some competing Shopify stores for inspiration.
At a broad level, you should cover information about average delivery times, costs, and what happens in the case of a delay.
Return and Exchange Policy
Make sure your customers have a clear insight into how you handle returns and exchanges. A clear returns and exchange policy will give customers confidence in your business, which could boost your conversion rates.
Ensure you outline exactly how you deal with returns; how long customers have to request a return after making a purchase, and how quickly they’ll receive a refund.
Contact Page
I mentioned the Contact Us page above, but it’s important to ensure this is carefully configured so customers can reach you if they have any questions.
The more modes of contact you include on your contact page, the more trustworthy you’ll seem.
Include a physical address, a contact form where customers can submit requests via email, and links to any social media accounts where you can handle customer concerns. You could also consider adding a phone number and a link for live chat.
Marketing your Online Store
Finally, it’s time to master digital marketing for Shopify. There are plenty of Shopify apps that can help you with this, but you can also start your digital marketing journey straight from the Shopify ecommerce platform.
Simply click on the “Marketing” tab in your dashboard, and you’ll be able to create a campaign via Shopify Email, social media, SMS, email, and even PPC ads.
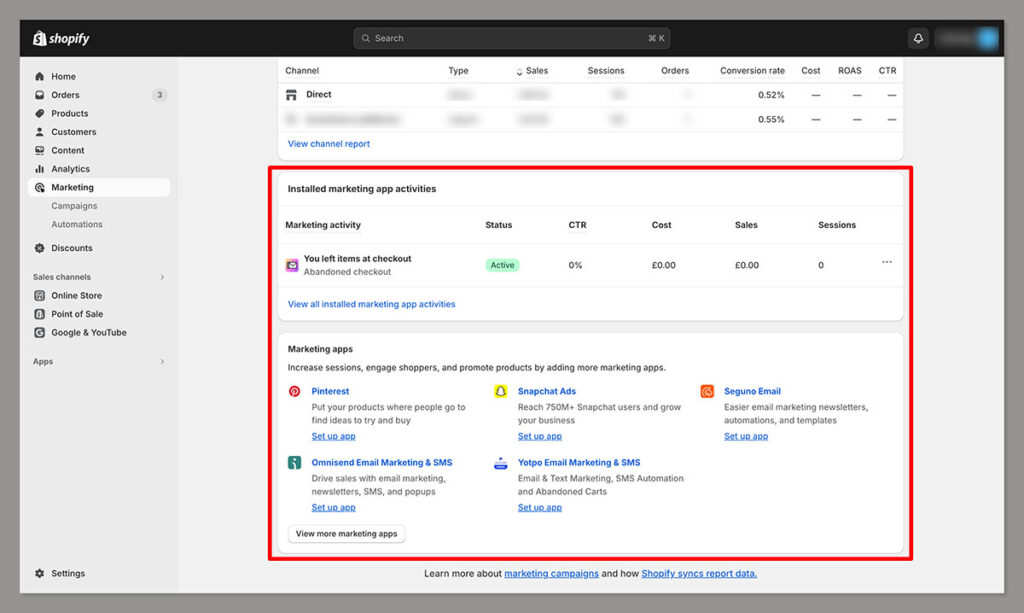
Here are some of the top marketing methods I recommend using to promote your Shopify store:
- Email marketing: Email marketing is an excellent way to nurture connections with your target audience and increase sales over time. You can encourage customers to sign up to your email newsletter with a landing page, or the promise of a discount, and create campaigns that showcase your latest products, drive sales, and build relationships.
- Social media marketing: Shopify naturally integrates with a range of social media platforms, so it makes sense to take full advantage of this fact. Find out which channels your customers use, such as Facebook, Pinterest, or Instagram, and make sure you have an active presence on these platforms. Create both paid and organic campaigns to reach the widest audience, and consider working with influencers to boost your credibility.
- Content and SEO: Shopify already has various features built-in that will help you to optimize your store for the search engines. However I recommend also creating your own blog or news page where you can share regular, fresh content. Creating content regularly is a great way to show thought leadership, and attract customers through various stages in the purchasing journey.
Remember to keep a close eye on the results of each marketing strategy you use. Monitor engagement levels, and conversion rates, to determine which marketing strategies you should continue to invest in going forward.
Legal Considerations for Your Online Business
One quick thing to keep in mind is that while setting up an online retail business isn’t quite the same as running a store in-person, there are still legal considerations to address.
You’ll still need a business license to sell products online, for instance, and you may need insurance to protect your products, and your business from potential fines.
You’ll also need to ensure you have a strategy in place for dealing with:
- Tax laws: To ensure you don’t get into trouble with the IRS, you’ll need to collect the right taxes from your customers, and ensure you’re keeping track of all your sales, transactions, and expenses. Using an accounting tool integrated with Shopify can help with this.
- Data privacy: Ensure you’re adhering to data privacy regulations like GDPR, and make sure your customers know exactly which information you collect about them. Store data securely, and make sure you’re using a PCI compliant payment processing solution.
- Marketing and advertising laws: Marketing and advertising laws are there to protect customers from unfair and deceptive practices. Make sure your marketing materials are truthful and accurate, and avoid making any false claims.
5 Reasons to Move Your Retail Business to Shopify
At this point, you might be wondering why you would go through the complex process of moving your business to Shopify in the first place.
Here are a few reasons I’d give to business leaders:
- Exceptional reach: With Shopify, you can sell products not just through your online store, but through countless other social media channels and marketplaces too. There’s even an integrated point of sale system for selling in-person. Plus, you’ll be able to create localized experiences for customers in various geographical markets, with Shopify Markets. This gives you a fantastic opportunity to unlock new avenues of revenue.
- Fantastic user experience: Of all the ecommerce platforms I’ve used in the past, Shopify is one of the simplest to master for beginners. The platform is convenient and straightforward, with all the essential features you need already built-in, so you can start making sales instantly. Plus, there’s plenty of support out there for new companies, including a fantastic community of helpful developers, store owners, and experts.
- Great marketing capabilities: Shopify is one of the most SEO-friendly ecommerce builders out there, with access to highly customizable titles, meta tags, and alt text descriptions. It also gives you guidance on how to optimize each of the pages you create as you’re building. Plus, with access to tools like Shopify Magic, you can even get assistance with developing search-engine optimized content for product pages and other parts of your site.
- Great extensibility: Shopify makes it simple to extend your store with new features and functionality whenever you like. There are thousands of apps available on the Shopify app marketplace, so you can integrate your platform with all of the tools you already use. Plus, you can make granular changes to various parts of the Shopify interface and experience with APIs on certain plans.
- Easy scalability: Shopify also ensures your store can scale and grow over time. Not only can you easily take advantage of new sales channels and marketplaces, but you can upgrade your subscription as needed, and take advantage of new features, as well as lower credit card processing rates. There are no hidden costs to worry about as you scale, and Shopify even opens the door to new business models, like dropshipping.
Frequently Asked Questions (FAQs)
When choosing your Shopify plan, I recommend considering the size of your business, and your monthly sales volume carefully.
While cheaper plans might have a smaller monthly fee, they also have higher credit card processing rates, and reduced access to crucial features, like admin accounts, and advanced reporting tools.
Shopify offers companies a range of free and premium themes that are specifically tailored to different industries, which you can customize with the Shopify theme editor.
You can change colors and fonts, add your own pictures and more. Plus, you can choose to work with a Shopify developer to design your own custom theme from scratch.
If you already have all of the details you need for your products, such as SKUs, images, and descriptions, I’d recommend using the bulk upload method, or using an app to migrate product details from another site into Shopify.
It’s also worth experimenting with the automated collection builder, to help with grouping products.
Shopify already allows you to customize meta tags, alt descriptions, and page titles to boost your search engine rankings.
I’d also recommend adding image tags to your pages, ensuring that your URLs and file names match the content, and conducting in-depth keyword research, to ensure you’re targeting the right terms on each page.
Content marketing and SEO are excellent for drawing attention to your Shopify store from the search engine result pages.
You can experiment with social media marketing to connect with customers on a range of channels, and even consider working with influencers to boost the credibility of your store.
Email marketing is also a great way to nurture relationships with customers.
Ensure you have the right business licenses for selling products in each region you want to reach. Make sure you invest in appropriate insurance for your company, collect taxes following regional and country-level guidelines, and keep track of your financial data.
Additionally, be sure you’re adhering to data privacy and protection laws.
Migrating to Shopify – Conclusion
The ecommerce landscape is growing at an incredible rate, offering retailers an incredible opportunity to boost profits and revenue, by connecting with an evolving global audience.
While there are plenty of ecommerce platforms that can help you take your business online, Shopify is my favorite.
It’s one of the most flexible and scalable platforms out there, giving you the freedom to sell across multiple channels, create localized experiences for different countries, and manage everything from a simple centralized dashboard.
If you want to reach a wider selection of customers, unlock new channels for revenue, and boost brand awareness this year, now could be the perfect time to move your retail business to Shopify.


Comments 0 Responses